With over 2 billion monthly active users, and over 400 new sign-ups every minute, Facebook is easily the king, queen or what have you royal figure of social media.
In fact, considering that 79% of Americans use it, and over half (53%) use it several times a day, its hold on the throne is quite secure.
For you, this means that your customers most likely spend a large portion of their online time every day on Facebook. In other words, if you’re looking for the perfect avenue to reach them, Facebook is your best bet.
One more thing, when you take into account that 26% of Facebook users who clicked on ads reported making a purchase, if you want to not only reach them, but also get them to act, taking advantage of their ad platform is a social media best practice must.
After all, Facebook advertising is so targeted that you can narrow your audience by age, interests, behavior and location, and not even spend more than $10 for 1,000 impressions!
That’s all well and good, but to get the most out of their ad platform, look no further than automating Facebook ads manager rules because Facebook ad automation is one of the best parts of advertising with their platform.
In essence, all you have to do is set up rules and their conditions and let things take off from there.
For example, you can create rules to:
- Turn ads off when they’re not performing well so you don’t waste money
- Increase a budget if an ad is performing particularly well so you get the most out of it
- Send you a notification if you spend a certain percentage of your lifetime budget
In doing so, you can spend more time on more important things than tracking your campaigns all day; just set some parameters and leave the rest to Facebook.
Read More About: How Facebook’s New Ad Metrics Can Help Your Business
How to Set Up Automated Rules
Now that we’ve covered a bit about automated rules, it’s time to learn how to set them up.
To this end, you can find a digital agency with social media marketing services or do things yourself.
If you’re choosing the former as a way of bolstering your social media strategy, you’re pretty much done because they’ll explain everything you need to do.
If you opt for the latter, you can created rules to either make changes to your campaign, ad set or ad automatically, or to send you an alert when your rule’s conditions have been met.
They also continuously run until you turn them off, so there’s no need to keep checking up on them every five minutes.
That being said, let’s start with automated rules for your ads.
Create an Automated Rule for Your Ad
The first step in our Facebook automated rules guide is to visit Ads Manager. Once here, click the checkbox next to the campaign, ad set or ad you wish to modify.
Afterward, you’ll see a “Rules” dropdown menu where you’ll need to click on “Create A New Rule” to open a window that lets you set up new rules.
To do so, go to the “Apply Rule To” dropdown and apply the rule you’ve chosen, and then select what you want that rule to do when its conditions are met (in the “Action” dropdown). For example, you can:
- Turn off campaigns/ad sets/ads: Turns off your campaign, ad set or ad.
- Send notification only: Sends a notification to yourself or other people on your ad account when your rule makes changes to your ads.
- Adjust budget: Increases or decreases the daily or lifetime budget of your ad set.
- Adjust manual bid: Increases or decreases the bid of your ad set. This action only works on ads with manual bids.
- Unpause: Unpauses your ad based on a rule you set. You also have the option to pause ads this way.
- Scale budget/bid: Adjusts your budget based on a rule you set. For example, if CPI is $1 and you would like $2, you can double your budget.
As for the conditions, go to the “Conditions” section and choose the condition you’d like to set up by clicking on “Add” (for any additional conditions, click on the (+) sign).
To make sure everything is as it should be, you’ll want to confirm your preferred notification type. For example, while you’ll always receive Facebook notifications, you can also select email notifications and even add people you want to receive notifications as well.
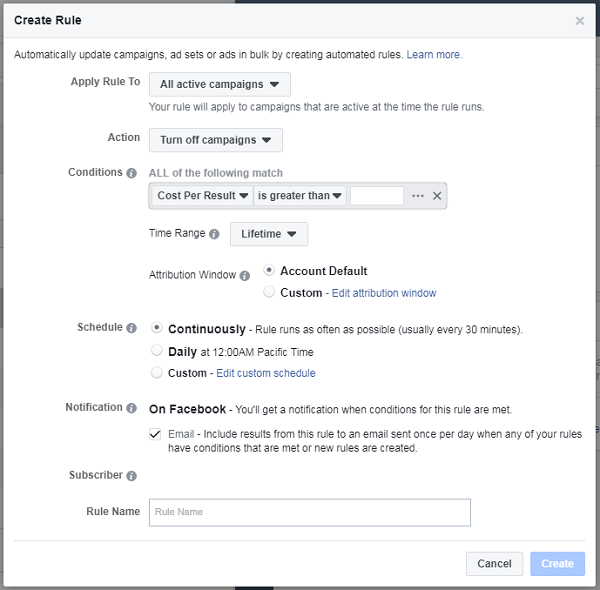
Finally, choose a rule name and click “Create” — that simple.
Create an Automated Rule for Budgets and Bids
With Facebook ad rules covered, it’s time to cover automated rules for budgets and bids. Keep in mind that this process will be similar to the one for ads, so bear with me.
Again, start by going to Ads Manager and clicking on the checkbox of the ad sets you’d like to modify.
Also again, go to the “Rules” dropdown and click on “Create A New Rule,” where you’ll see an “Apply Rule To” dropdown. Here, apply the selected rule to your ad sets.
Then, in the “Action” dropdown, click on “Adjust Budget” or “Adjust Manual Bid” to increase the budget/bid by either a fixed percentage or fixed amount, or set a maximum/minimum budget.
Afterward, enter any other information you’d like, such as the conditions and notifications, choose a name and click “Create.”
How to Manage Automated Rules
With the ad set rules Facebook has out of the way, it’s time to focus on Facebook manage rules.
At the risk of sounding like a broken record, yet again start by going to Ads Manager.
Here’s where things depart from the previous section; instead of clicking on the campaign, ad set or ad, you want to click on the “Ads Manager” dropdown menu on the top left corner, and, under the “Ads Manager” section, on “Automated Rules.”
You’ll then be taken to a “Manage Rules” page where you can edit rules and turn them on or off:
- To edit a rule, click on it in the table and edit away.
- To turn a rule on or off, click on the toggle next to the rule’s name (blue is on and grey is off).
Keep in mind that you can also delete a rule if you find it’s not what you want anymore. For example, because editing rules doesn’t allow you to change where one applies or which action it takes, to do so you’ll have to delete it and create a brand new one.
Back on editing, after clicking on the rule you want to edit, you’ll see a window where you can change its conditions (select a new condition, time range or attribution), update the notification settings, or add any additional subscribers to it. Once you’ve finished, click “Save Rule” and you’re done.
To delete a rule, in the window that appears after clicking on the rule you want to edit, simply click on “Delete Rule” and, again, you’re done.
How to Track Automated Rules
Finally, the last item pertaining to automated rules we’ll cover today is tracking them. We briefly touched on this before, but your rules run continually until you turn them off.
To expand on this, you can choose to check rules continuously (e.g. every 30 minutes) or daily (12:00 AM in your ad account’s time zone) until your campaign ends.
To check and track their status, go to the “Automated Rules” section we covered in the section above.
Here, click on “Activity,” where you’ll see things such as:
- Whether an action was taken on your campaign, ad set or ad
- If an alert was sent to your ad account
- If any of your rules turned off a campaign, ad set or ad
- If any of your rules increased or decreased the budget of your ad set by a percentage/dollar amount
- If any of your rules increased or decreased the manual bid for your ad set by a percentage/dollar amount.
Once you’ve done that, PRESTO! You’re finished.
Read More About: How to Use Facebook Live in a Digital Marketing Strategy
Final Thoughts
After covering all of that, you no doubt have a list of best Facebook automated rules you want to start using on your pay per click advertising.
Whatever they are, rest assured knowing you’re using one of the best ad platforms you can get your hands on. Not just one of the best platforms, but one of the best features on that platform, i.e. automated rules for your ads.