Marketers and business owners are always looking for new and improved ways of getting in front of their audience and improving their Google Ads conversion rate optimization.
Likewise, Google is always looking for new and improved ways of making that happen.
Today, we’ll be talking about such a way, which is accomplished through Smart campaigns that run on the Google Display Network.
What Are Smart Display Campaigns?
Smart Display campaigns are a campaign type offered by Google that uses machine learning to automatically find new and existing customers, set the right bids and create engaging and responsive ads that fit on any screen or ad space across the Google Display Network.
As to the how, all you have to do is enter your ads’ building blocks—their assets—like their headlines, images and logos, and Google will find as many users to display them to as they can within your CPA bid and budget.
To do this, Smart Display campaigns combine three optimization technologies that take the difficulties of targeting, bidding and ad creation out of the equation:
- Automated bidding that uses your target CPA to set bids according to the likelihood of a conversion in each and every ad auction.
- Automated targeting that optimizes as your campaign runs so your ads can increasingly appear where they’ll get the most conversions.
- Automated ad creation that generates responsive ads from the assets you’ve provided.
Read More About: Need Help Deciphering Paid Media Advertising? Here’s the One and Only Glossary You’ll Need
What Do I Gain from Smart Display Campaigns?
Smart Display campaigns are for you if you’re a fan of high performing campaigns that garner results. They’re also for you if you’ve been searching for better ways of attracting users sooner rather than later in the sales cycle, i.e. you don’t want to depend on retargeting to get a sale.
Additionally, instead of relying on manual bid strategies and targeting, desktop- or mobile-only campaigns, or a painstakingly slow ad creation process, Smart Display campaigns take the brunt of the work and do pretty much everything for you.
For instance, not only do you get a simple campaign construction flow, an easy to understand interface to manage all your ads, and a streamlined tracking process, but also the ability for your campaigns to automatically optimize themselves with the best combination of assets that lead to higher performance.
In other words, you’ll be able to work smarter, not harder.
How to Set Up a Smart Display Campaign
The essence of Smart Display campaigns is to automate and optimize the whole ad-creation process through machine learning powered targeting and bidding.
To get started, here’s what Google recommends doing before you begin:
- Set up conversion tracking if you haven’t already, which is a free tool that shows you what happens after a user has interacted with your ads (e.g. whether they made a purchase, called you, signed up for a newsletter, etc.).
- Make sure you meet the conversion-based eligibility requirements of getting at least 50 conversions on the Display Network across your standard display campaigns, or at least 100 conversions across your search campaigns in the last 30 days.
- Ensure you have a sufficient daily budget to account at least twice your target CPA bid.
- Have all of your ad’s assets ready, such as its headlines, descriptions, images and logos.
That being said, Google recently rolled out the new Google Ads experience as an improved way for users to manage their accounts, meaning that creating Smart Display campaigns can be done in two ways.
For us, this means that we’ll first cover how to create Smart Display campaigns on the new Google Ads experience, and then the previous Google AdWords experience for those who haven’t made the update.
How to Create Smart Display Ads and Google Smart Campaigns on the New Google Ads Experience
As we just touched on, we’re going to begin with the New Google Ads Experience:
Step 1: Determine how your campaign will be structured
You’ll first want to create separate campaigns if you have separate budgets for each, separate ad groups for different product lines or services, or separate Responsive Display ads within your ad groups so you can group like assets together.
Step 2: Determine what a conversion is worth
For the second step, you’re going to have to set up bid amounts for what you’re willing to pay for each conversion.
To this end, think of what your goals are.
For example, if you want to generate leads, set a CPA bid that reflects what a lead is worth for your business, and if you want to get more sales, set a CPA bid that reflects the value of getting a sale (e.g. If your product is worth $100, and you expect 5% of people to convert, your target CPA bid could be $5).
Step 3: Set up your campaign(s)
The third step is where we’re going to veer away from the previous AdWords experience:
- Sign into your Google Ads account
- On the left-hand side of the page menu, click on Campaigns
- Click on the “+” button and then select New campaign
- Choose your goal, which can range from Leads, Sales or Traffic goals
- Select your desired Display campaign type
- Select Smart Display campaign and click Continue
- Pick your campaign’s geographic and language targeting
- Enter your daily budget and CPA bid
- Click Save and Continue
- Click on Additional settings
- Click on the drop-down under “Dynamic ads,” which will select “No data feed” by default
- Click on the checkbox next to “use a data feed for personalised ads”
- Choose the relevant feed from the drop down menu
- Click Save
Step 4: Create your responsive display ads
Because we live in a mobile-first world, responsive display ads are the default ad type for Smart Display campaigns.
For those not in the know, this means the ads can automatically adjust their size, appearance and format to fit available ad spaces.
That being said and like we just covered, Google will automatically generate ads with the assets you entered that are optimized for any available space.
Note: Responsive display ads can show as almost any size text, image or native format.
To create the ads, this is what you need to do:
-
- Sign into your Google Ads account
- On the left-hand side of the navigation panel, select Display campaigns
- On the left-hand side of the page menu, click on Ads & extensions
- Click blue “+ button
- Select Responsive display ad
- Select an ad group and, if you want your responsive display ads to support dynamic remarketing, make sure to attach your ad group or campaign to a feed
- Because images are required to give you access to all of Google’s ad formats, you’ll have to add and save your images. You’ll be able to add up to 15 marketing images and 5 logos, and can also crop a single image to the landscape and square formats, or use separate images for each aspect ratio:
- Landscape: Landscape image should have a ratio of 1.91:1 and be greater than 600 x 314 —> Max file size is 5MB
- Square: Square (1:1) images should be greater than 300 x 300 —> Max file size is 5MB
- Logo (optional): Logos should be square (1:1) and should be 128 x 128 or greater, with the recommended size being 1200 x 1200. Google also recommends adding a landscape (4:1) logo, which should be 512 x 128 or greater, with the recommended size being 1200 x 300 —> Max file size is 5MB
- (Avoid) Text:Your text may not cover more than 20% of the image.
Note: To fit in some ad spaces, your image may be cropped horizontally – up to 5% on each side.
-
- Complete your ad information with multiple headlines and descriptions, and keep the following in mind:
- Write short headlines— you can upload between one and five headlines of 30 characters or fewer—that may appear in tight ad spaces.
- Write long headlines of 90 characters or fewer that appear in larger ads
- Write a description— you can write between one and five descriptions of 90 characters or fewer—that invite people to take action.
- Complete your ad information with multiple headlines and descriptions, and keep the following in mind:
Note: When rendered in an ad, your long headline’s length will depend on the site it appears on. If shortened, the long headline will end with ellipses.
-
- Include your business or brand’s name.
- Include the final URL, which is where people will go when they click on your ad.
- You also have the option of going to the advanced URL option and choosing to add tracking or custom parameters to your URL, clicking MORE OPTIONS and choosing a CTA text, and choosing a promotional text and a price prefix if you have dynamic responsive ads (e.g. “Free shipping on orders over $35”).
- Because responsive display ads are made to fit into almost any ad space on the Display Network, you should preview the most popular sizes and formats for your ads to get an idea of what they’ll look like
- Click Save
- Wait at least a week after your ad is approved before you review its performance
Step 5: Optimize for conversions
For the fifth step, you can take the backseat and let the system optimize your ads for more conversions.
Google suggests waiting about two weeks for this to happen, with the sweet spot being waiting until you have about 40-50 conversions, as Smart Display campaigns can take time to scale and stabilize.
Step 6: Check your campaign’s performance with the asset report
After and while your campaign is being optimized, you’ll do well to check on its performance so you can further optimize it.
First, click View asset details in your “Ads” tab so you can get a report on your assets’ performance.
Here, your assets will be ranked relative to each other as “best,” “good” and “low,” based on how well they’ve generated conversions.
If you see a status of “waiting,” that asset has not been reviewed and approved yet; a status of “learning” means the system is still gathering data.
Step 7: Use the asset report to make incremental changes
Following the asset report, you’ll want to exchange “low” assets for those that are more like your “best” assets, and then wait about two weeks for those assets to generate ranking data.
From there, you can go through the process again so you can remove any “low” performing asset and load up on better ones.
Note: Your assets are ranked relative to one another, so an asset that was once “good” may become “low” as you exchange assets for one another.
How to Create Smart Display Ads and Google Smart Campaigns on the Previous Google AdWords experience
Now that we’ve covered the New Google Ads Experience, let’s dwell on the previous Google AdWords experience so everyone can know how to create Smart Display campaigns:
Step 1: Determine how your campaign will be structured
The same as above (the New Google Ads Experience).
Step 2: Determine what a conversion is worth
The same as above (the New Google Ads Experience).
Read More About: 10 Tips to Increase Ecommerce Sales through Paid Media Advertising
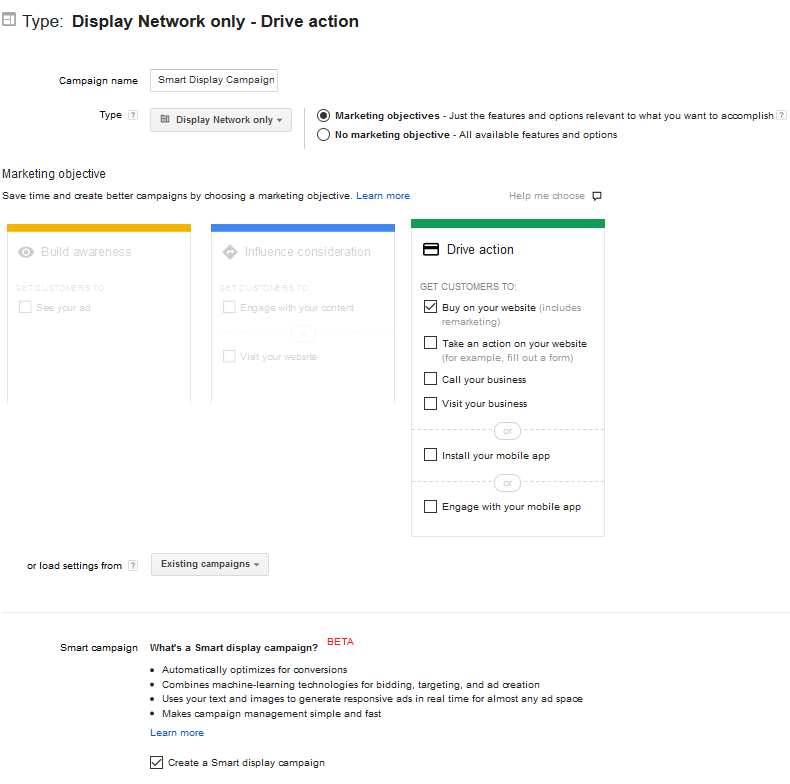
Step 3: Set up your campaign(s)
Here’s where we change lanes from the new Google Ads experience:
- Sign into your Google Ads account
- Click on your Campaigns tab
- Click +Campaign and select Display Network Only
- Name your campaign
- Under marketing objectives, pick one of the first four objectives under “Drive Action”
- Scroll down and check Smart display campaign
- Pick your campaign’s geographic and language targeting
- Enter your daily budget and CPA bid
- Click Save and Continue
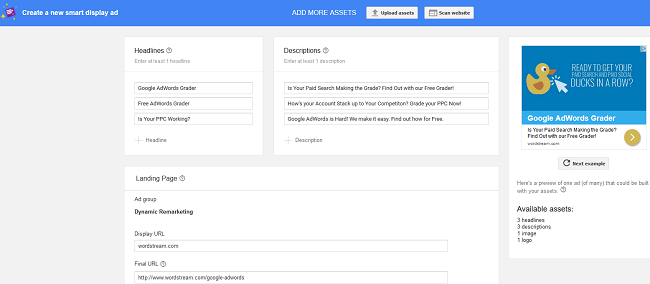
Step 4: Enter your assets
Now that you have the groundwork laid out, it’s time to enter your assets.
You’re going to have to enter one landing page and at least three headlines, three descriptions, three images and three logos for this step, so make sure you have everything ready.
Note: Your assets must be interchangeable with one another so machine learning can do its thing and choose the best combination of each.
As for the Google Smart Display ad specs:
- Headlines: Make sure to use keywords in your headlines, and that they reflect the content in your descriptions, images and logos —> 25 characters max
- Descriptions: Make sure your descriptions invite people to take action, and that they reflect the content in your headlines, images and logos —> 70 characters max
- Images: For the greatest reach, Google recommends uploading multiple 1.91:1 landscape images with the recommended dimensions of 1200 x 627 and 1200 × 1200 (images can be as small as 600 × 314 and 600 × 600) —> The maximum file size is 1MB, and most common non-.gif formats are accepted as well
- Logos: Google recommends dimensions of 1200 × 1200, but logos can be as small as 128 × 128. If applicable, also upload a landscape logo with an aspect ratio of 4:1 (512 × 128) —> Upload 1:1 square logos and, as above, the maximum file size is 1MB, and most common non-.gif formats are accepted here too
Step 5: Optimize for conversions
The same as above (the New Google Ads Experience).
Step 6: Check your campaign’s performance with the asset report
The same as above (the New Google Ads Experience).
Step 7: Use the asset report to make incremental changes
The same as above (the New Google Ads Experience).
Final Thoughts
With artificial intelligence backing them up, Smart Display campaigns are a godsend for marketers and business owners who want to get in front of a new audience, a new audience that is likely to convert.
Hopefully you have everything you need after reading through the Google Smart Display example strategy above.


Tell us your thoughts in the comments