Simply put, this idiom means that a person should continue to buy things in a store until they are physically tired and cannot do so anymore; thus dropping to the floor. Sounds pretty harsh, right? Well, if you’re the one selling these items, you would be extremely pleased that people are so infatuated with your products (just maybe not the dropping to the floor part).
Google Merchant Center allows sellers to do just this.
What is Google Merchant Center?
I’m glad you asked, title header! Before we get into what ‘Google Merchant Center’ is, we should begin with a discussion on ‘Google Shopping’.
Best defined by Search Engine Land:
“Google Shopping is a dedicated shopping search engine from Google. It allows searchers to find products for sale from online merchants, with search results featuring product SKUs, information, prices, stock availability and merchant ratings… Unlike ‘regular’ Google, only those who pay via PLAs – Product Listing Ads are included within Google Shopping.”
Phew! That was a lot.
Google Merchant Center is merely the tool used by offline or online merchants looking to upload their product information and make their store available on Google Shopping. Some of the attributes included within product listings are:
- Product ID
- Product Name
- Product Description
- Price
- Status of Availability (Is it in stock?)
- Link to Your Website
What’s So Awesome About Google Shopping?
Another great question!
With over 40,000 search queries every second, Google is by far the most popular web service on the internet, and people are constantly searching for products. Google Shopping Ads, also called Google Product Listings Ads (PLAs), are an affordable and efficient means of driving sales and brand visibility for your business. It’s an essential and pragmatic way to make sure your advertisement budget is being spent efficiently because you only pay when a user clicks on your product’s advertisement. If your business needs help with this, definitely check out a Digital Marketing Agency that’s well-versed in PPC services.
Once your business sets up their Google Merchant Center, there are a wealth of benefits that come with it. These include:
- An increase in product visibility.
- Integration with Google AdWords: Advertisements are tied to products easily and remarketing techniques are readily available.
- More granularity: Custom labels allow you to tag your products based on certain attributes. There is also support for geographical tagging, which enormously supports local business shopping.
- Reporting features: Google Analytics provides support for specific Google Merchant product listings, which provide metrics for your business to rank its performance against competitors.
- Review system: Embedded as part of your product listing are public reviews that rank your goods on a 5-star scale. According to Vendasta, “68% say positive reviews make them trust a local business more” and “92% of consumers now read online reviews.”
Are you now asking, “How do I set up a Google Merchant Center?” Lucky for you, Google provides us with step-by-step video tutorials on how to accomplish this. For your reference, here are the steps and screenshots involved in the process:
Step 1: Create an Account
Quick and simple, the first part into getting started with is to go to the following URL:
https://merchants.google.com/Signup
Once on the page, fill in your business and contact details:
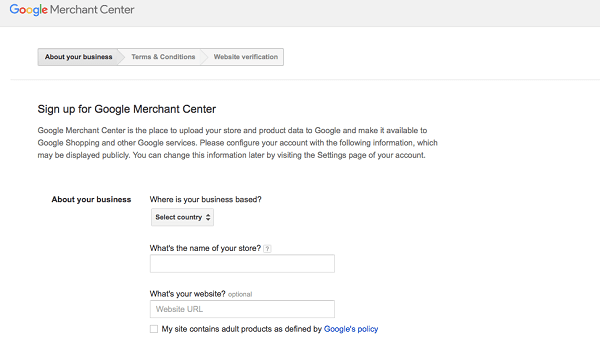
Go ahead and click “Continue” on the bottom of the page.
On the next page, accept the “Terms & Condition” (Unless of course you’re an outlier and would prefer to read through them).
You will then be brought to the “Website Verification” portion of the set-up.
Step 2: Verify and Claim Your Website
On the Google Merchant Center dashboard, click on the “Settings” tab on the side of the screen.
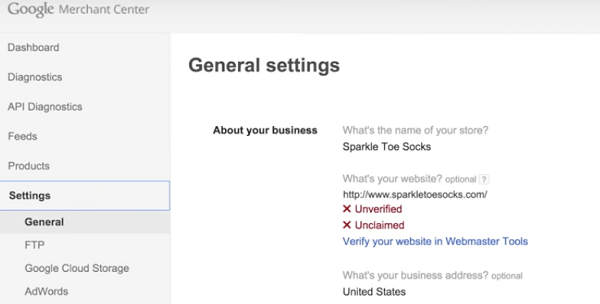
Then go ahead and click on the link that says, “Verify your website in Webmaster Tools.”
You will then be brought to the verification set-up page.
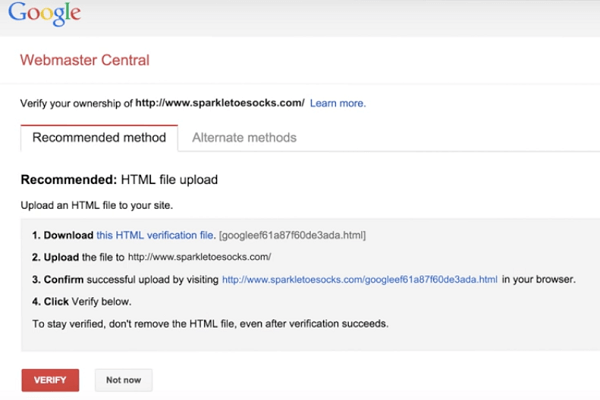
From here, your best bet is to follow the “Recommended method”. If one of the “Alternate methods” works better for your company’s situation, then by all means feel free to go through that process.
The list of steps Google provides is fairly straightforward and will help guide your company through the entire procedure.
After you see the green check next to “Verified” within the “About your business” section of the “General settings” page, all that’s left is to claim your website.
At the bottom of the “General settings” page, click on the “EDIT SETTINGS” button.
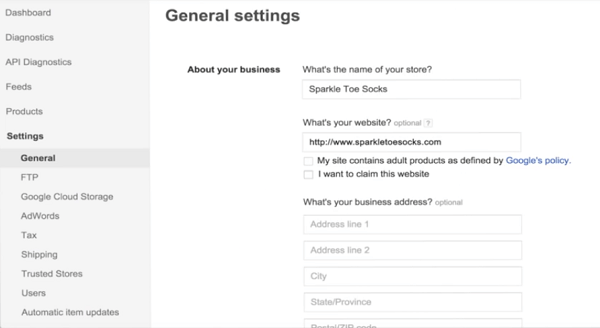
Check the “I want to claim this website” box, then scroll down to the bottom of the page and click the blue box that says, “Save”.
And Voilà! Your Merchant Account is all set-up and you are now ready to create a Google Shopping Campaign.
Items like uploading/setting up your data feed are still up for your business to accomplish before setting up a Shopping Campaign. Depending on how big your inventory is and how prepared/detailed you want your products to be (You’re going want it to be as detailed as possible), this can be a fairly time consuming process to follow.
Step 3: Linking Accounts
First off, congratulations on the new merchant account!
In the Google Merchant Center dashboard, click on “Settings” on the left hand bar and then click on “AdWords” within that dropdown.
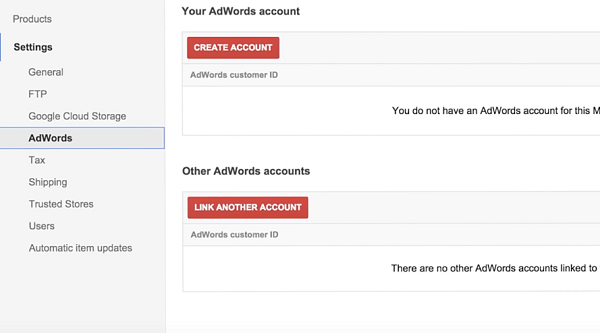
If you don’t already have an AdWords account, click on the “CREATE ACCOUNT” button and follow the steps provided on that page.
If you do already have an AdWords account, click on the “LINK ANOTHER ACCOUNT” button and follow those steps.
Step 4: Creating your Campaign
After you link your AdWords account with Google Merchant Center, in the “AdWords settings” click on the button that now reads, “CREATE SHOPPING CAMPAIGN”.
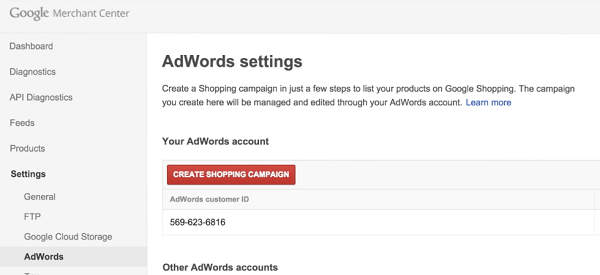
Next, fill out the required information that includes your “Max CPC” and “Budget”.

After you click the blue “Save” button, a prompt will appear confirming your creation of a Shopping Campaign. You can then go to your AdWords account and configure any settings or make any changes you deem necessary.
A second congratulations is in order! (Insert hands clapping emoji here)
The Wrap-Up
Investing time and money into promoting your business through Google Shopping is something that shouldn’t be overlooked. Product Listing Ads and AdWords campaigns are fantastic ways to efficiently sell goods to online consumers. Don’t fret if things get too complicated! Go to your friendly neighborhood SEO agency that specializes in PPC services and ask for some help!
Now get out there and start selling!